It's one thing to have them on blogs (here today, gone tomorrow) but quite another to see poor photos in magazines, or even quilt-group newsletters. Editors tear their hair and gnash their teeth at the quality of photos they get sent. And time and time again we're told that the quality of the images submitted for this or that exhbition was not acceptable.
So what do you do about taking better pictures? You need to know how to prepare your quilt for photography, how to set up the shoot, what settings to use on your camera. What you do with the images afterwards is another area of expertise, but there are simple things you can do that make a big difference.
First of all, what's a "decent photo" of a quilt? At a minimum:
1-large file size (for printing, minimum 5MB)
2-in focus
3-taken dead square
4-saturated colours
Following from this, there are some simple things you can do:
1. Set your camera to the biggest file setting. Every camera differs, but the principle is the same; on mine, this is done via Menu Set, and the first option is Picture Size, which ranges from 0.3M to 12M; I used 5M as the standard setting, and will up the file size when taking any quilt photo that will be printed out. Often the camera has a Quality setting - put it on "Fine".
2. Wait for the camera to focus - it's not always instantaneous! Click halfway and let the camera do its job, then click all the way. Most cameras have an Anti-Shake setting (often called Stabilizer) - I love it and use it all the time as a standard setting.
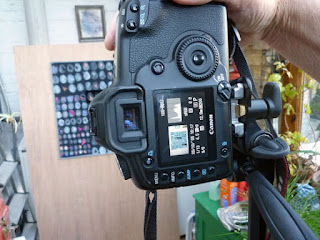
3. Use a tripod if possible, with camera set dead square to the centre of a quilt pinned to a board that is vertical, not slanted.
 Here's my tame photographer doing just about all the right things when photographing my Breakthrough quilt. What's relevant here is that the camera is on a tripod and is centred on the quilt, which is pinned to a board. The board could be at a better vertical angle, and it could have an even more neutral background, but we knew we'd be adjusting for those factors when processing the photo. (In Photoshop we used Transform-Skew to make it square, and Magnetic Lasso-Invert-Levels to cut away the background.)
4. Saturated colours rather than too-pale or too-dark - some cameras allow adjusting the colour, and sometimes you have to do this in a photo manipulation program. The main thing when taking the photo is to have even light so the colours can attain their values. This is why it's best to photograph in the shade, not the sunlight - sunlight leaches out the colour. And avoid having a shadow fall on part of the quilt!
One thing I've realised is that I don't actually "know" my camera - when I got it, I turned off the sounds, put it on automatic, checked that it was set to Auto White Balance, Anti-Shake, and Flash Off, and mostly use it in that mode, as I mostly take snapshots; it's small enough to live in my bag, and I use it every day.
It takes a while to get out of "film mentality" - instead of being careful about what you take, with digital photography the modus operandi is to take lots of photos ... and then delete 90% from the camera, before downloading to your computer. (Deleting is so important!)
But to get back to taking decent photos of quilts - here's where "film mentality" comes back into use - be careful in setting up the photo. Take several, making minor adjustments - that's what professional photographers do, they "bracket the shot" at different exposures, then choose the best result.
4 comments:
Thank you for this advice. I keep saying about going to classes to learn how to use my camera.
I read this and immediately got out my camera with the idea of resetting it to take larger files etc but couldn't find anything under the menu for this at all. I realized that I know nothing at all about my camera and just point and fire...hence all my grotty photos! It's a cannon G9 so I can't believe it doesn't have these options somewhere, so I shall have to spend some time investigating. Thank you for pointing me in the right direction! Great post.
My Canon A95 is coming on 5 years old so it doesn't have that wonderful image stabilization feature.
In addition to all the steps you mentioned, I use the 10 second delay even with the tripod so the camera is as still as its' going to get when the shutter (?) snaps (?).
Good advice Margaret. I've been practising using the Manual mode recently too. There is a lot to learn .. I hate reading manuals BUT they are very useful! lol!
Post a Comment