 These are both A4 size (about 8 1/2" x 11") and consist of piecing and fusing (though you could use straightforward applique instead of fusing). Here's how to make them.
First, the one on the left - with its fat tail. Draw out the pattern on a sheet of letter paper, as shown. I used plates to get smooth circles; with a compass, it's easier to get the right size. Don't worry about spacing the triangles - there's an easy way to do that later. (The fabric scraps indicate some "naturalistic" colourways.)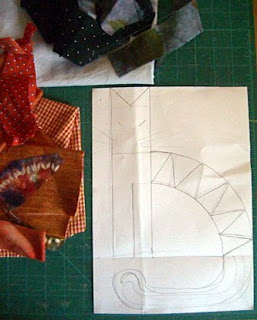
Cut the pattern into pieces. For the zigzags, fold the arc in half, then in thirds, and use those fold lines to get the size of the triangles (see below). I made little cuts and later discovered that they aren't needed. And you can also ignore the extra triangular bit on the tail - just cut the tail straight across at the top.
My pattern has notes about what fabrics to use for which piece, and the order of putting it together. As the method combines fusing (raw edge applique) and piecing, it's useful to write on the pattern where additional fabric for seams is needed.
The fused bits are the triangles that go on the arc, the ears, and the tail.
 Now cut out the pieces. You can use the paper as a template to iron the curves into place.
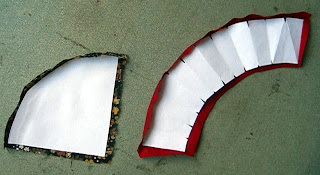
Then iron some bondaweb or other fusible to the 6 triangle pieces and the tail (or fuse the fabric before you cut it out). Here I did the ears as separate pieces, but you can cut them all-in-one with the body and just put fusible under the ear part, then fuse them onto a square instead of the triangular bit. (Clear as mud?)
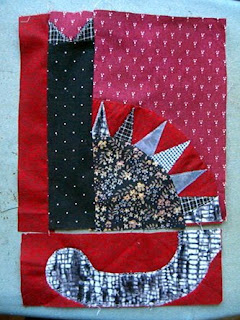
To help the tail "join" to the cat, I cut a small triangle in the tail fabric and fused that down too. (The original idea of having that triangle as part of the tail was impractical.) Then I stitched round the fused edges - but you can wait to do this as part of the quilting.
Then pin and handstitch the curved edges. After you have that rectangle, add the cat's body, and then the bit of background to the left.
Fuse the tail to the bottom, and stitch the bottom rectangle to the top.
I finished both the cat quiltlets with a "pillowcase" finish, sewing the front back right sides together, and including the wadding at that point (spraybasted to the front so it would stay in place when the quiltlet was turned right side out). I drew around a piece of A4 paper with a ballpoint pen, on the inside of the backing, and machined just inside that line, taking a stitch diagonally at each corner.
The backing has a strip of fusible at the top, on what will be the inside -- so that after you've slashed the backing (through the middle of this strip) and turned the quilt right side out, you can "repair" the slash by butting the raw edges and ironing the backing down. (It's a good idea to press the sides before ironing down the slash area.) You can put the hanging sleeve over the slash, if you're adding a sleeve.
 Most of the quilting is "in the ditch" -
 Now, the cat on the right, with the skinny tail. It has a border, so the actual cat is a bit smaller.
 To make the pattern get some plates of suitable sizes - 
 I'm in two minds about the tail - you might want to leave it out altogether, perhaps replacing it with the proverbial Mat.
 If you want to be fussy about the sawtooth bits, you can use the folded arc to draw a window to preview your fabric. Extra fabric below the "tooth" goes into the seam and gets covered.
 Assembly is as above, but with borders around one or more sides. A binding would look good, if pillowcase finish doesn't appeal.

and a ruler for the straight bits - the exact proportions aren't crucial - cats come in various sizes!
I'm in two minds about the tail - you might want to leave it out altogether, perhaps replacing it with the proverbial Mat. If you want to be fussy about the sawtooth bits, you can use the folded arc to draw a window to preview your fabric. Extra fabric below the "tooth" goes into the seam and gets covered.
 Assembly is as above, but with borders around one or more sides. A binding would look good, if pillowcase finish doesn't appeal.
Both these quiltlets are done completely on the machine, but could of course be handstitched.
4 comments:
Thanks for sharing this, it has solved a few "how did they do that" mysteries for me.
That is so cute. It would make a wonderful pillow case for a child. I don't like paper piecing but may just try it this once.
Thank you for sharing this Margaret. I shall save it for future reference.
Thanks Margaret - I shall definitely have a go at this one after Christmas! Have a good Christmas by the way!
Post a Comment